Accessibility
Canvas is the learning management system (LMS) available for San Diego State University classes, providing instructors with a platform to communicate with students, post course materials, and create online assignments. Creating accessible Canvas pages can be accomplished by incorporating the following practices into your authoring process.
Headings & structure
Headings provides an organizational and navigational framework for a document's content, communicating both the informational hierarchy and relationship between different sections. Headings also provide a simple mechanism for an individual using assistive technologies to "jump" from one heading to the next when navigating the document.
Adding headings
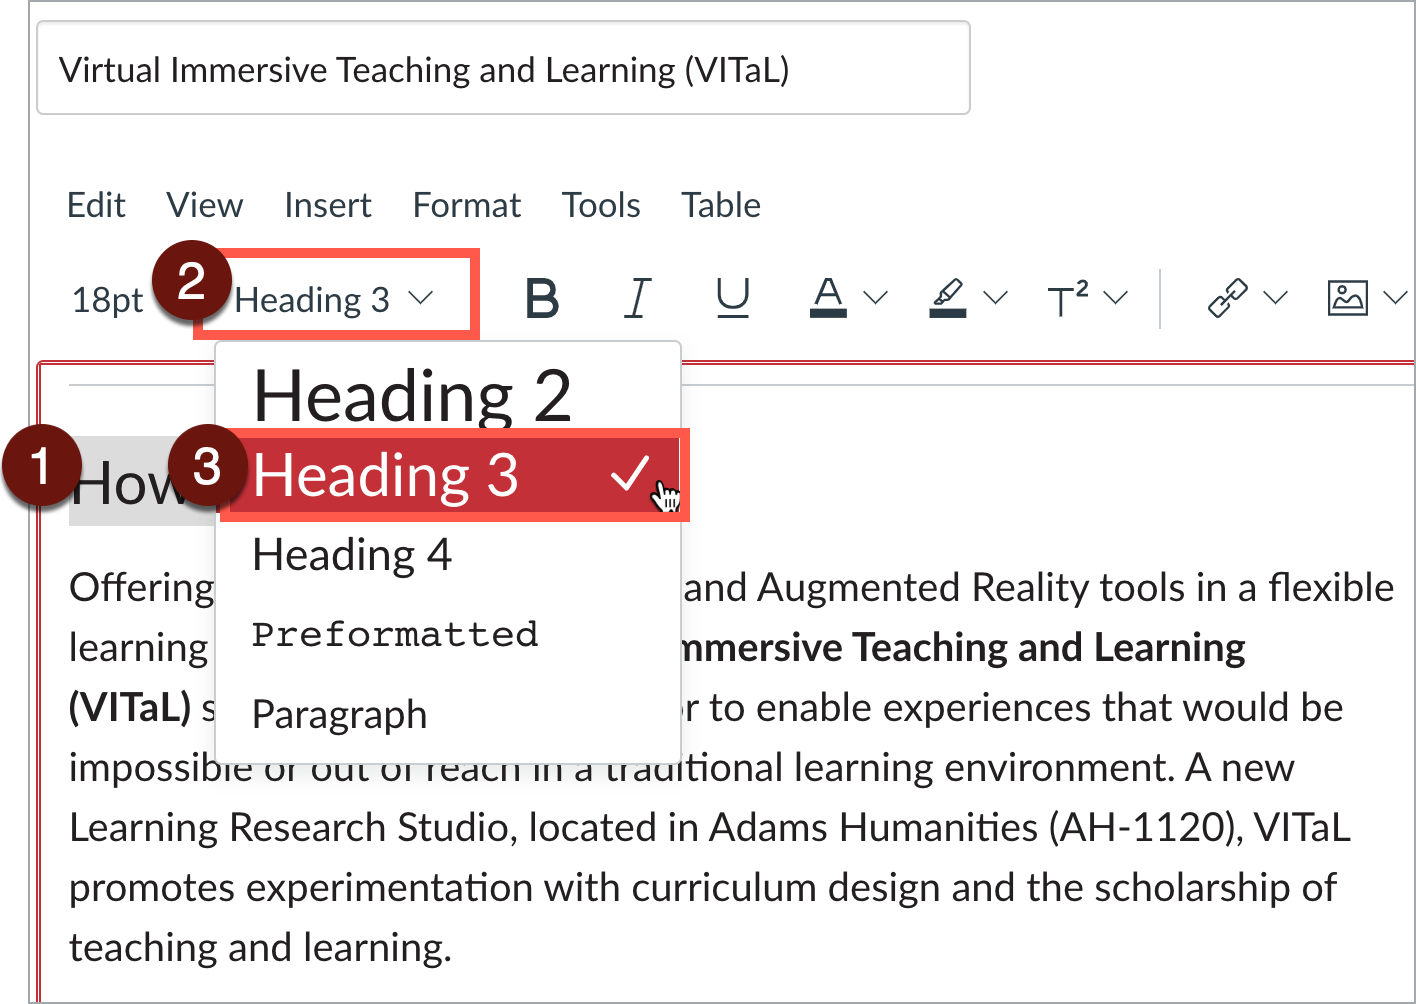
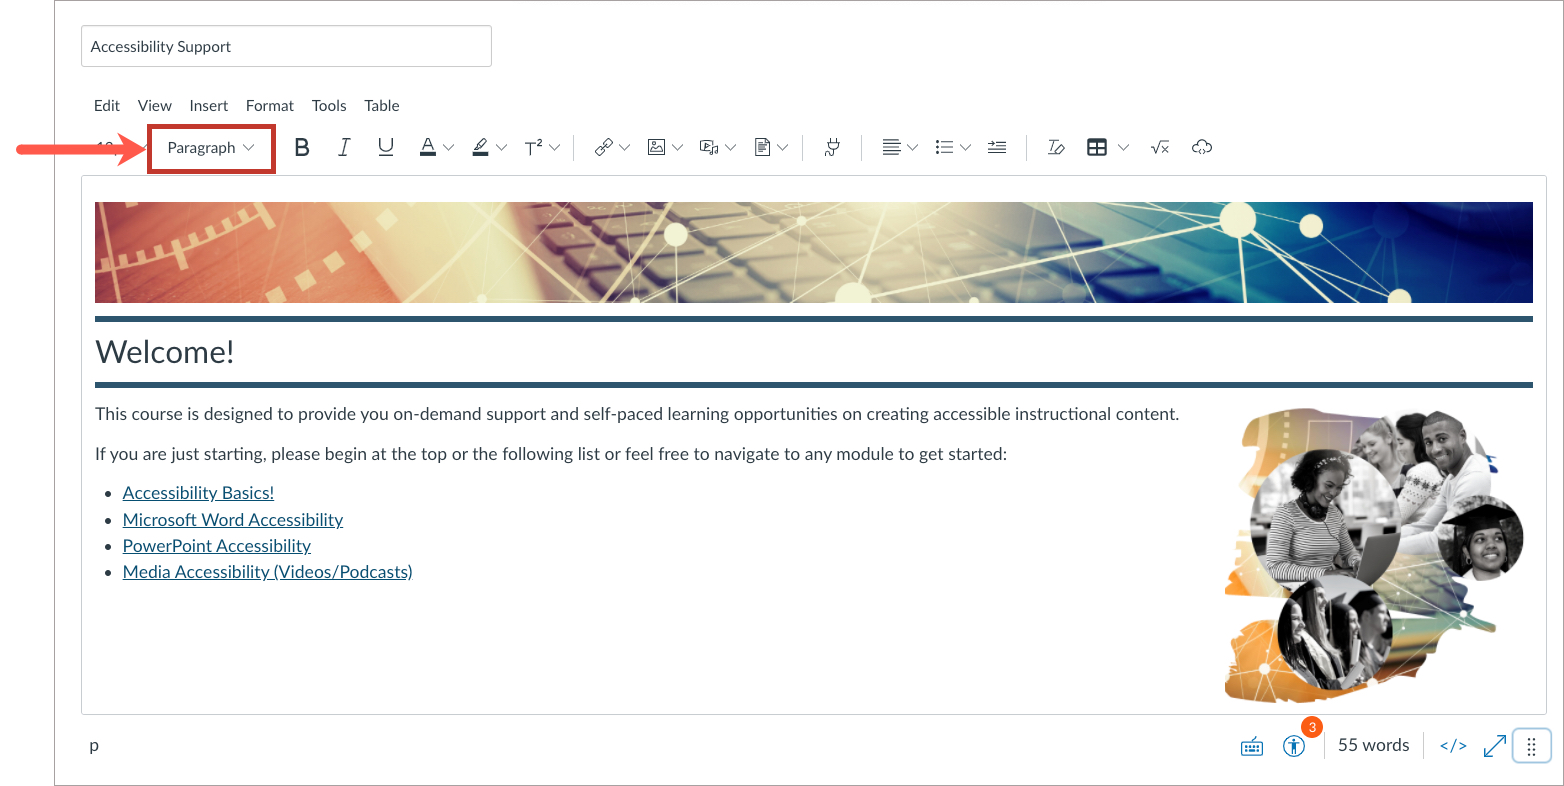
- Highlight the brief word or phrase, or place your cursor on the line.
- In the Rich Content Editor select the styles dropdown menu to reveal Headings 2-4.
Heading guidelines
- Headings should follow a logical structure that identifies content based on the organizational content and hierarchy of information in the document.
- Canvas automatically tags the page title as Heading 1. Page content headings should start at Heading 2.
- Avoid skipping heading levels.
- Headings should be short and succinct.
How to Fix Common Mistakes
Select the + below to expand each topic:
How this affects your students
Fonts, colors, and formats (bold, italics, etc.) are not used in lieu of heading styles.
Assistive technologies require html tags (that are automatically created when you use the Canvas rich content editor). For example, screen readers navigate throughout the page using headings. Headings need to be formatted using the built-in Rich Content Editor tool. No matter what the authoring program is (whether it is Canvas or a Microsoft Word document, for example) built-in tools place a unique "tag" on text or pictures that relay crucial information to screen readers like the heading level, the reading order, and defines whether an object is a text or an image. These tags help students access and navigate your instructional material.
Manually formatting "the look" of a heading (such as applying larger sized text) creates inaccessible instructional materials as it lacks the unique tagging that only the built-in rich content editors can provide.
Student navigation using a screen reader
When students use an assistive screen reader like JAWs, they can pull up a window called Heading List.
It will list all the headings you have placed on that page or document.
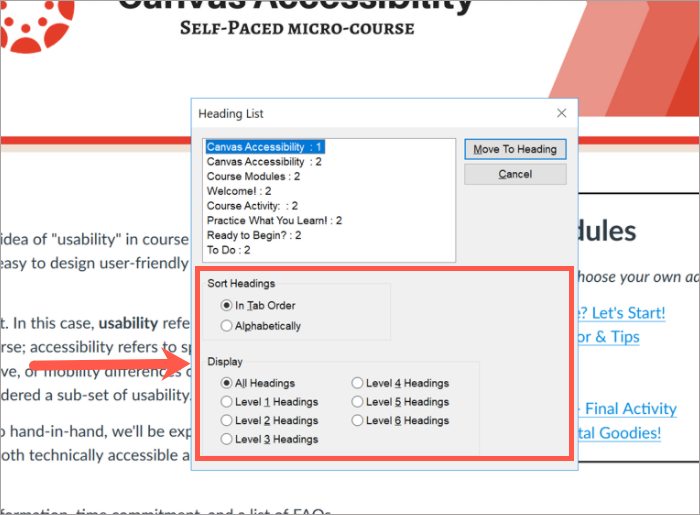
Students can also sort headings in tab order, alphabetically, and display all headings or specific headings.
It is absolutely critical to use the rich content editor to automatically generate tags that assistive technologies rely on to access content.

Why use the rich content editor?
Because it generates tags.
Example
Manually changing the text size, bolding, changing the color, and/or adding italics.
Fix it
To verify the heading style (paragraph, Heading 1, Heading 2, etc.) place your cursor on the line of the text you want to check.

Note:
In Canvas, heading styles are applied to the whole line.

For example, on the same line it is impossible to add a Heading 2 and then switch to paragraph:
Heading 2 paragraph
Scenario 2: Student MLA example: How do you approach accessibility?
The text "Heading 2" and "Scenario 2: Student MLA example:" above only looks like a Heading 2.
How this affects your students
Skipping heading ranks can be confusing to students as they will be searching for missing heading levels.
Examples
Note: For Canvas pages, the title is always Heading.
- Beginning a page or document with Heading 3 or 4 because you like how it looks.
Students who rely on assistive technologies, will wonder where Heading 2 is.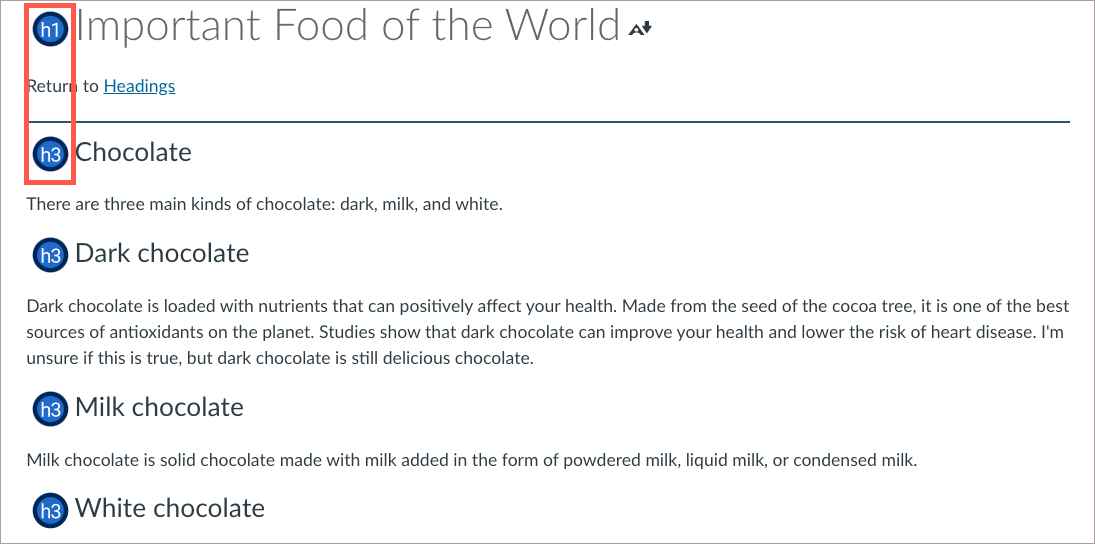
- Beginning a a page or document with Header 2 and immediately applying Header 4.
Students who rely on assistive technologies, will wonder where Heading 3 is.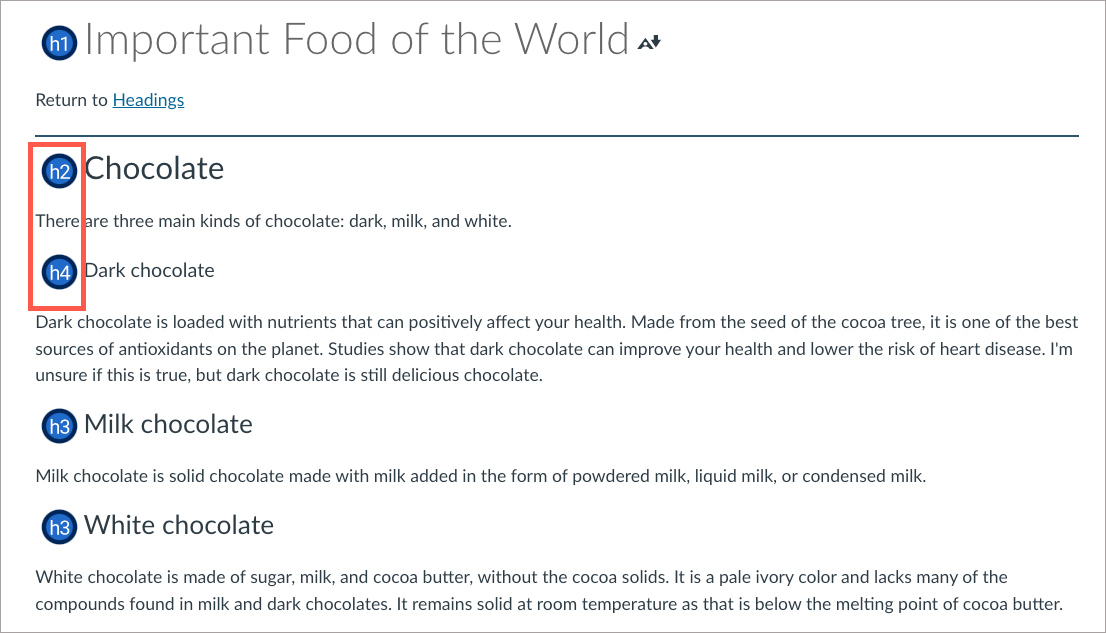
Fix it
Headings should be placed in the appropriate order beginning with:
- Heading 1 (Title of document)
- Heading 2 (New, independent main topics)
- Heading 3, etc. (Subtopics of previous main topics)
Lists
Lists provide a structured order to a group of connected or sequential content. A numbered or bulleted list may present the same information more effectively than simple data tables with fewer steps.
Adding list styles
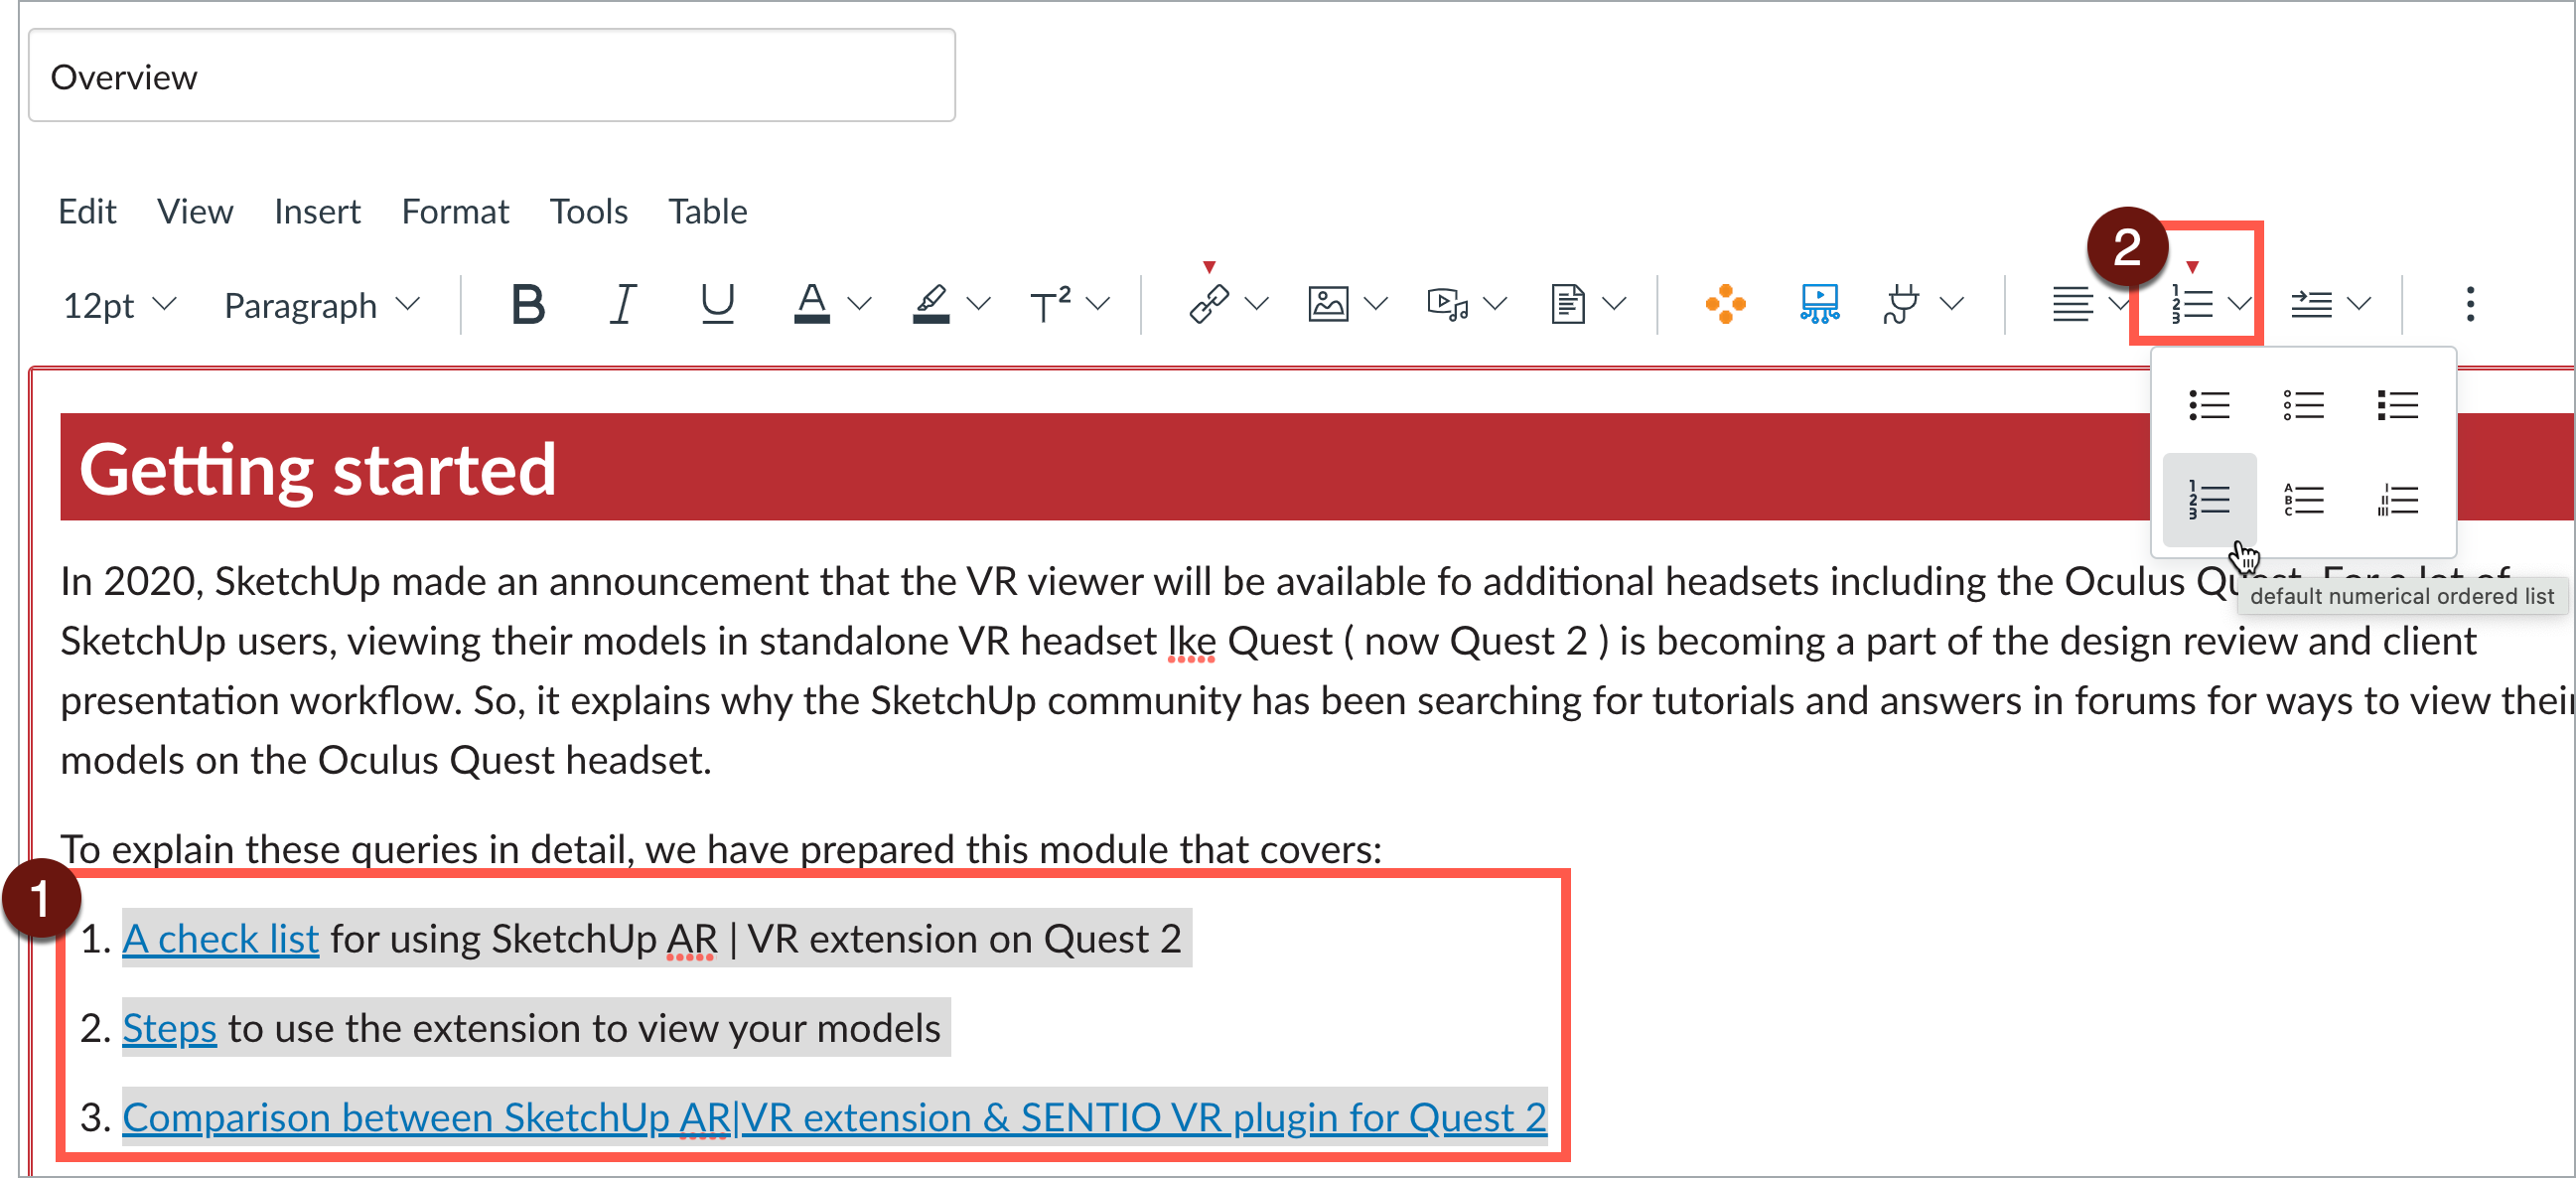
- Highlight the grouped text.
- In the rich content editor, select the appropriate list style (bullet or number list).
Formatting guidelines
- Apply list styles using the list style button in Canvas. Remove any lists created manually, such as those using dashes, asterisk, or other symbol characters.
- Avoid using indentation to provide a visual list in lieu of the list style button.
- Numbered lists are used to present a group of items (words, phrases, sentences) that follow a sequence.
- Bulleted lists are used for a group of items without a sequence.
- Lists should contain at least two or more list items, unless being used to create an outline.
- Nested lists are acceptable, such as a numbered list that contains a nested bulleted list.
Images
Images that support the content require a text description (also called "alt text") that communicates the purpose and/or content of the image. This information is presented to the individual using assistive technologies, allowing them to hear the description of the image. Image descriptions should be short and communicate the main purpose of the image. Images that are decorative can be marked as such and are ignored by assistive technologies.
If a longer description of the image is necessary to fully explain its content, consider inserting a more detailed description of the image within the document text that precedes and/or follows the image.
Adding Alt Text
- Select the image. The image should be outlined blue and have four blue squares at each edge.
-
When the image is selected, an Image Options will appear either above or below the image.
- If the image has pedagogical value, write a brief description in the Alt Text box.
- Select Done to save the information.
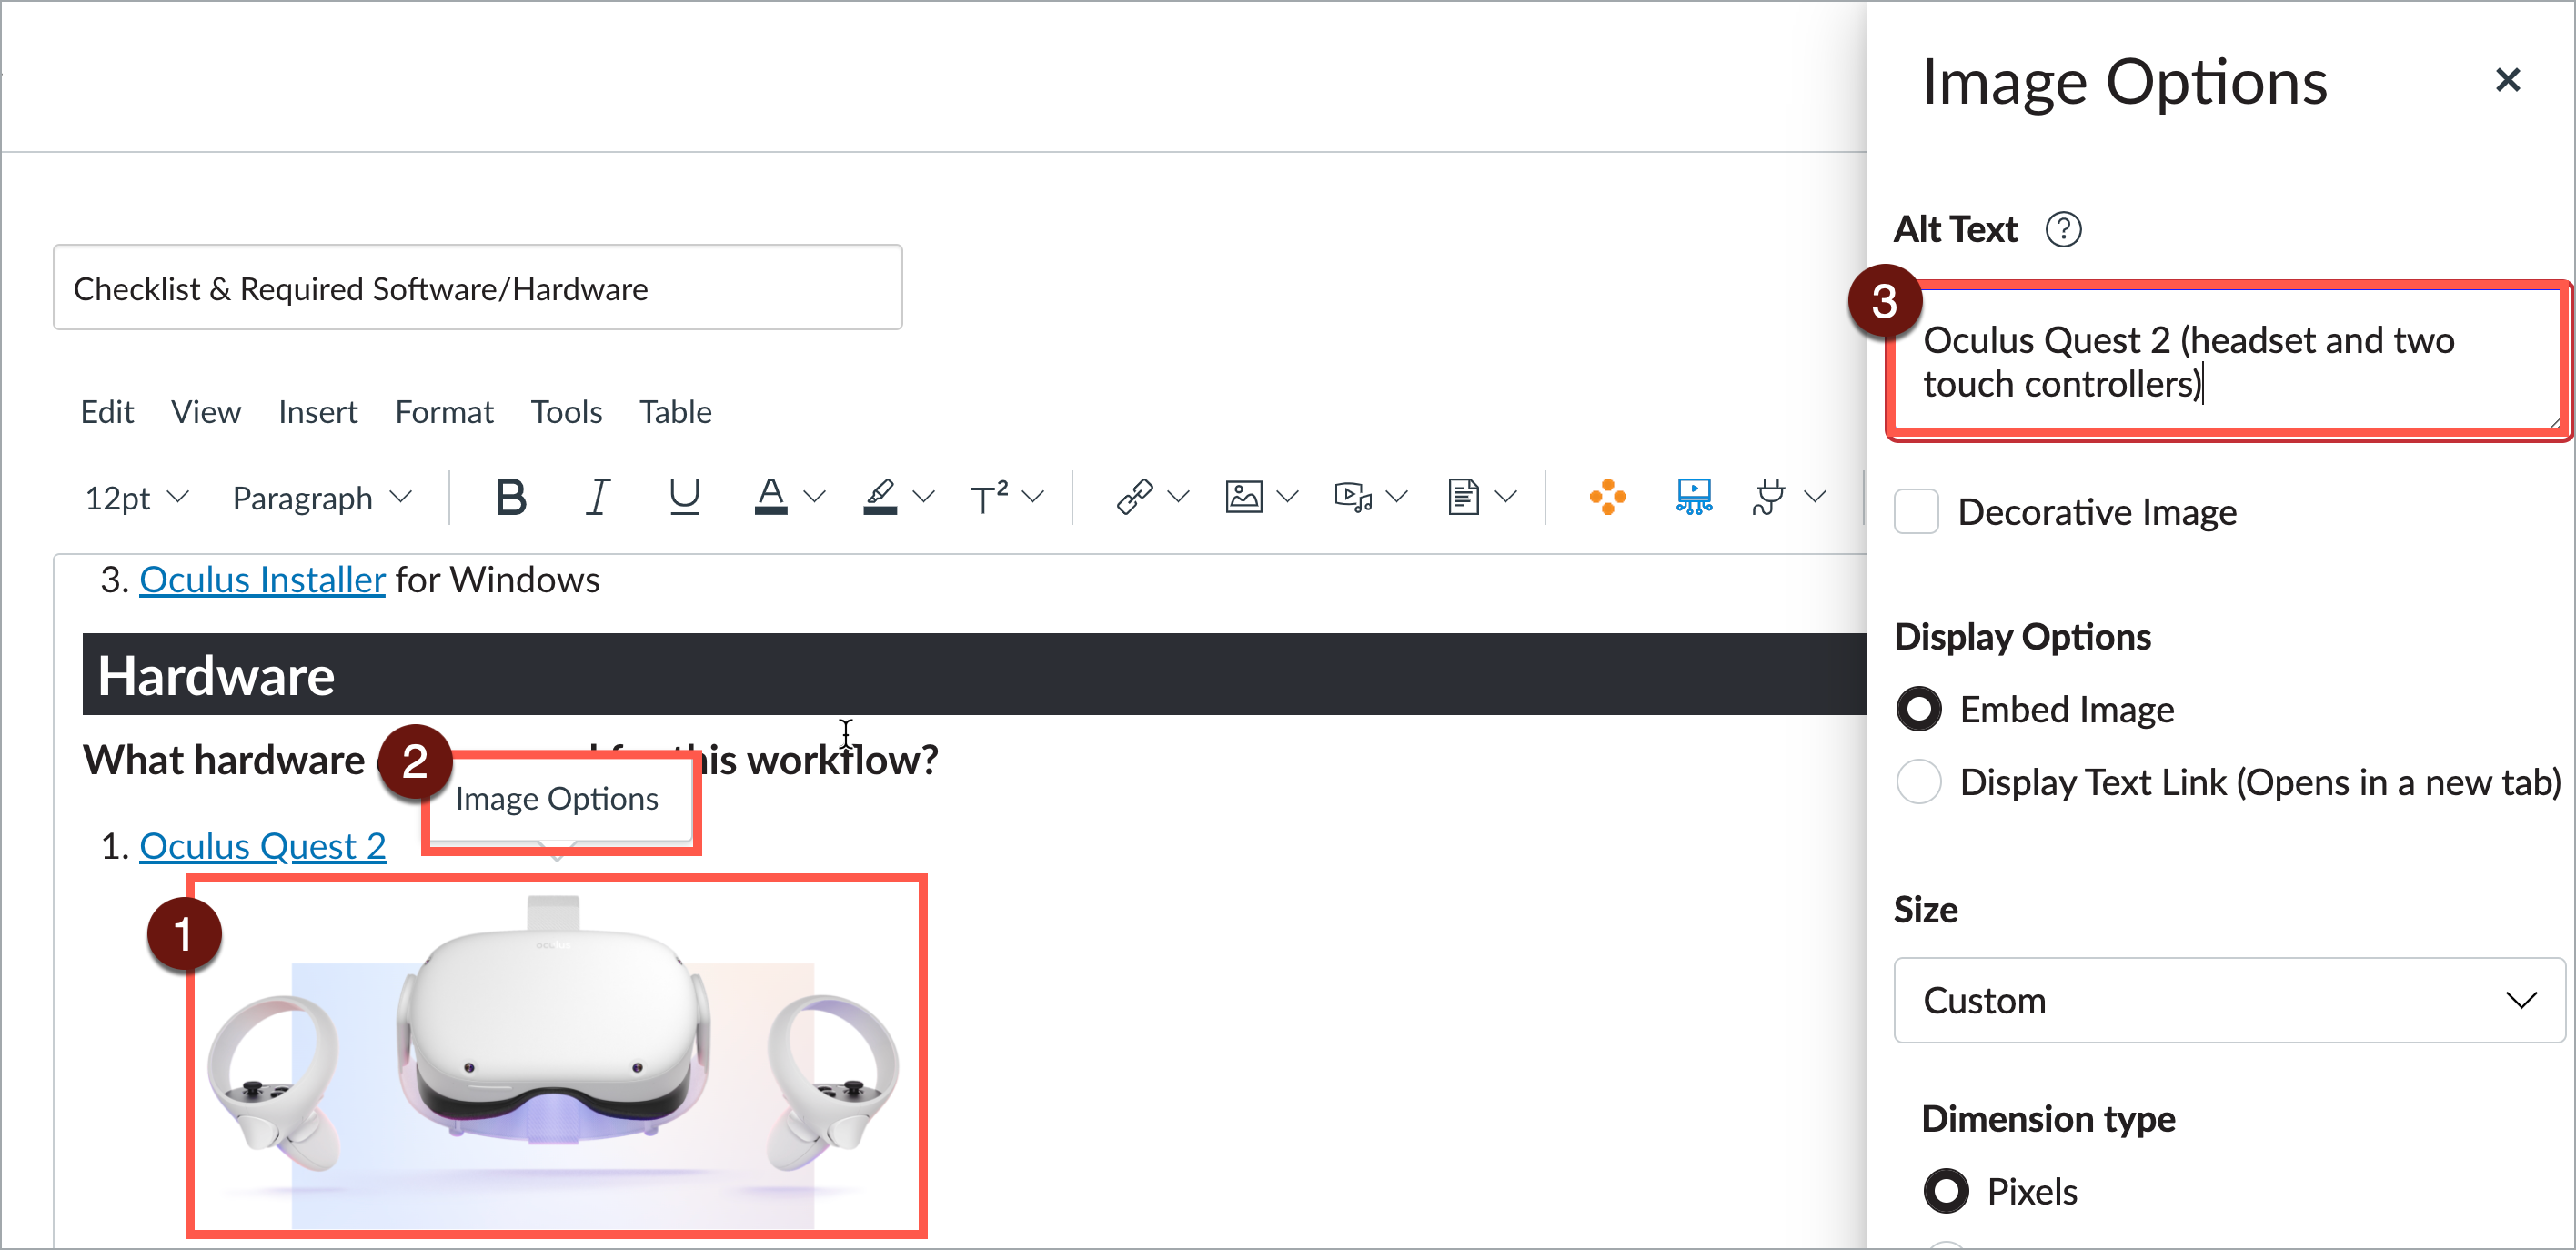
Image guidelines
- A text description should convey the purpose or content of the image in approximately 120 characters or less. Avoid repeating the same information as contained in the surrounding text.
- If the image is decorative, select the Decorative Image checkbox.
- If the image is complex, use a short alt text description for the image and then provide additional information in the surrounding text of the document.
- Do not include the file format in the alt text (Example: .JPEG, .PNG).
- Do not include phrases “A picture of” or “An image of” as part of the alt text.
How to Fix Common Mistakes
Select the + below to expand topic:
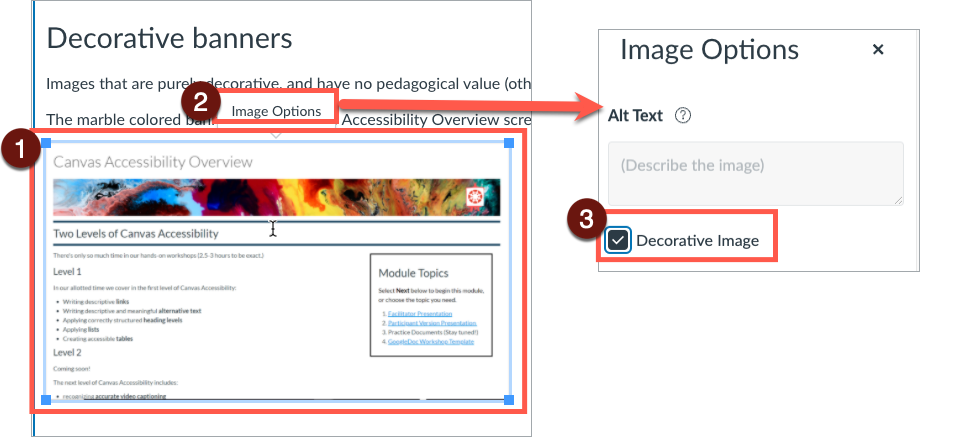
Images that are purely decorative, and have no pedagogical value (other than to provide visual appeal to a page) do not require a descriptive alt text.
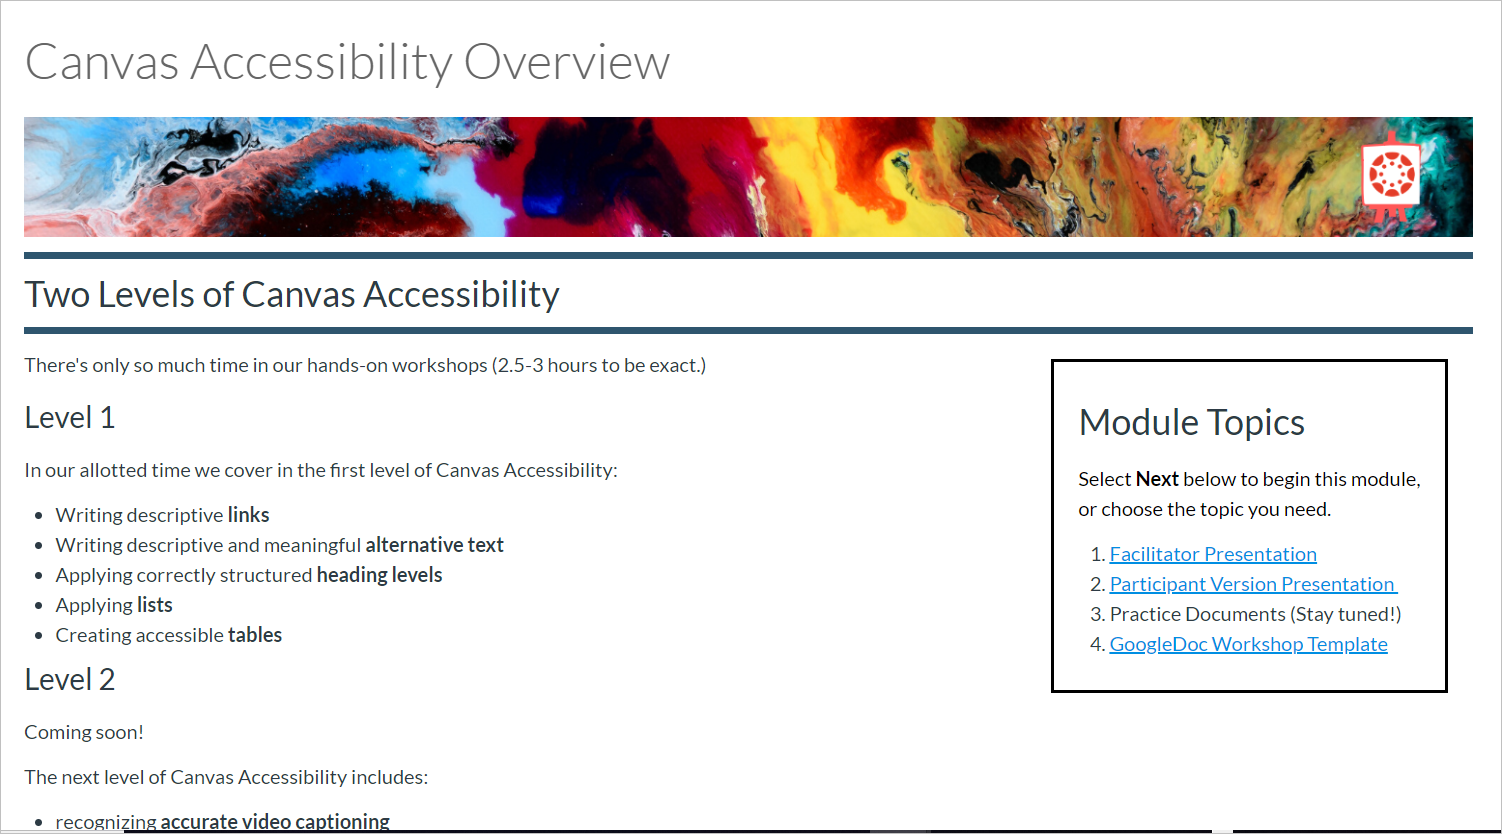
The marble colored banner on the Canvas Accessibility Overview screenshot serves as a decorative feature to add interest and sets a friendly tone.
Fix it
- Select image, then select Image Options.
- Under Alt Text select the checkbox Decorative Image.
- Select Done to save your work.
Links
Documents containing hyperlinks to websites or other online resources can be improved by using descriptive link text that is understood by the reader instead of the full URL. Using the full URL as the link text may not make sense to the reader, particularly if it is long.
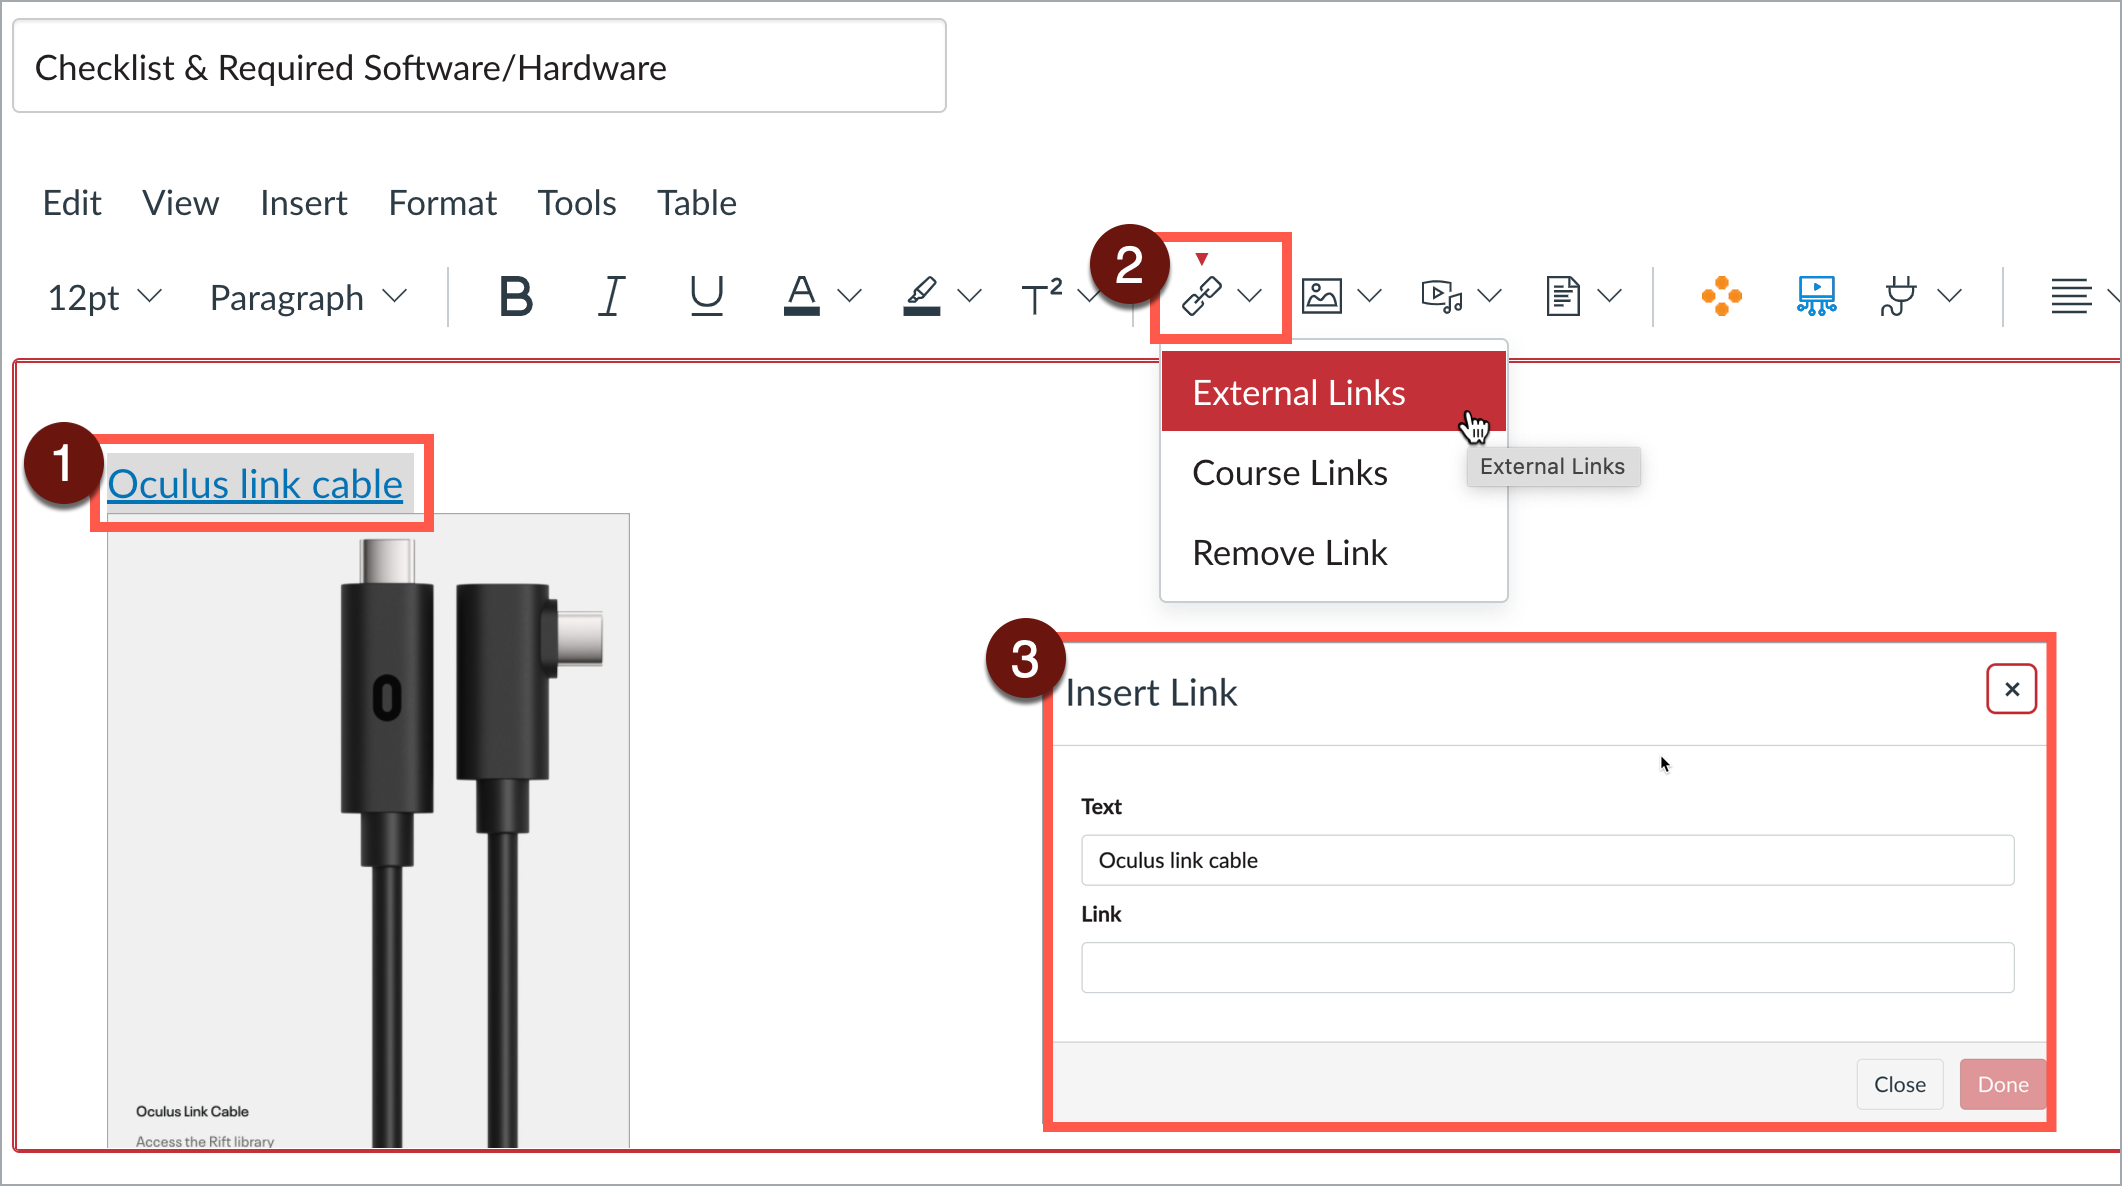
Link to an external resource
- Highlight the text to be converted into a hyperlink.
- In the rich content editor, select Links > External Links.
- In the Insert Link window, add the URL to the Link field. Select Done.
Edit an existing link
- Place cursor on link. A submenu will appear. Select Link Options.
- In the Text field, write descriptive text. Select Done.
Hyperlink guidelines
Use link text that is descriptive and or informs the person as to the link’s destination.
How to Fix Common Mistakes
Select the + below to expand topic:
Ambiguous text
Screen readers provide the ability to scan a page and generate a "Links List." The "Links List" can be extremely helpful, but only if the link text is descriptive.
This allows the user to listen to a list of hyperlinks that are available on the page and navigate directly to the desired hyperlink as opposed to being forced to listen to the entire page, line-by-line.
In the example JAWS Links List to the right, what does "job # is 10-003" link mean? Where will it lead us?
Redundancy
While this is one of the simplest methods to direct individuals to other web pages and documents, hyperlinks can also have potential accessibility challenges.
For example, under the "Inappropriate" section above, the Links List read by a screen reader will read aloud:
- Click Here
- More Info
- Read More
- Read More
- here
- her
Fix it
Screen readers automatically recognize links - you don't have to create an HTML tag. The key, then, is in the actual text of the hyperlink. Here are the rules to follow:
- Identify the purpose or function of the hyperlink as part of the hyperlink name.
- Be as descriptive as possible without being overly long - the user will have to listen to the whole link before moving to the next link on the list.
- Integrate the link into your sentence - sighted users will see the link, and screen readers will identify the link
Inappropriate
Appropriate
- Read about Captions & Audio Descriptions.
- Be sure to read our Academic Integrity Policy.
- Article 1: The Fall of Man, Article 2: The Rise of Man
- Learn more about color accessibility in terms of contrast and color-coding.
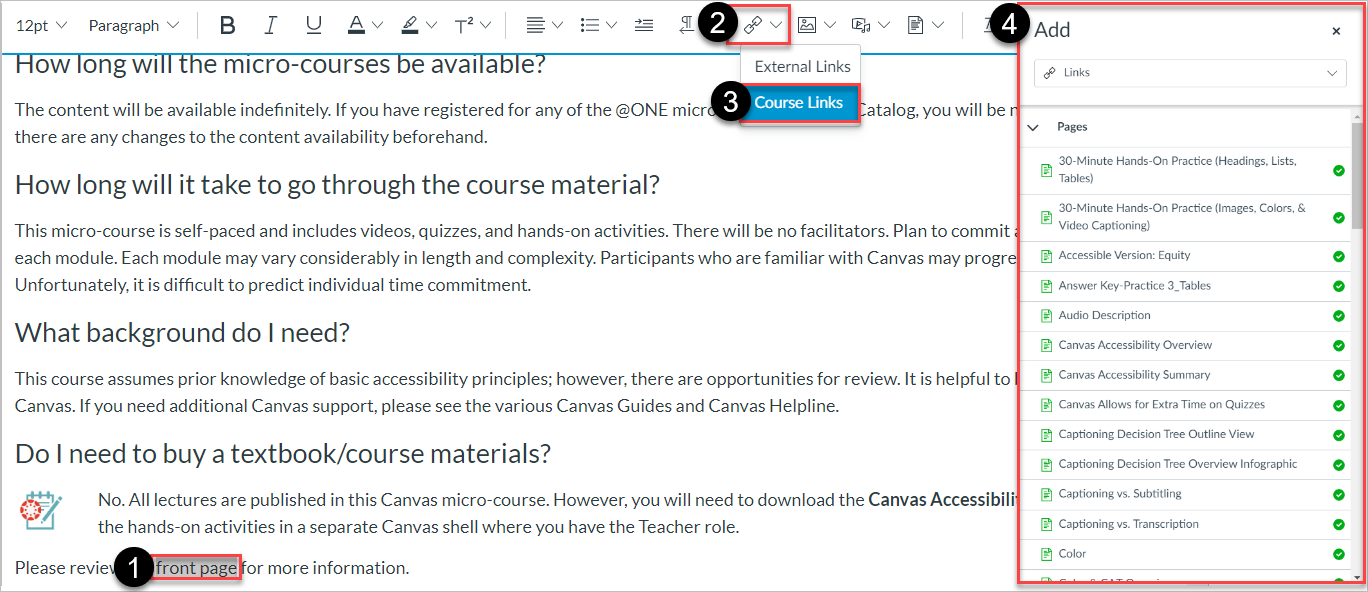
Linking to a page or resource in your course
- Highlight the descriptive text.
- In the rich content editor menu, select Links.
- Select Course Links.
- The Insert Content menu will appear on the right. Select the page, assignment, quiz, announcement, discussion, module, or specific course navigation you would like to link.
There's an added benefit to creating a link to a resource or page in your course this way. Using this method creates a "Relative Link," which means the link automatically updates when you copy your course in future sessions.
Tables
Tables in Canvas should be used for data and not layout purposes. An accessible table includes the following:
- At least one header (row and/or column).
- Alt Text description summarizing the table.
The easiest method to ensure an accessible data table in Canvas is to use the Accessibility Checker. After you create the table in the Canvas Rich Content Editor, use the Accessibility Checker to add the appropriate table header information.
- Create your Canvas page and then create a table.
- At the bottom of the editor, select the Accessibility Checker.
- In the drop-down menu Set a table header, select the appropriate header(s). Select Apply to save your work!
- Finally, under the Add a Caption field, write a brief and descriptive summary of the table. Select Apply to save your work!
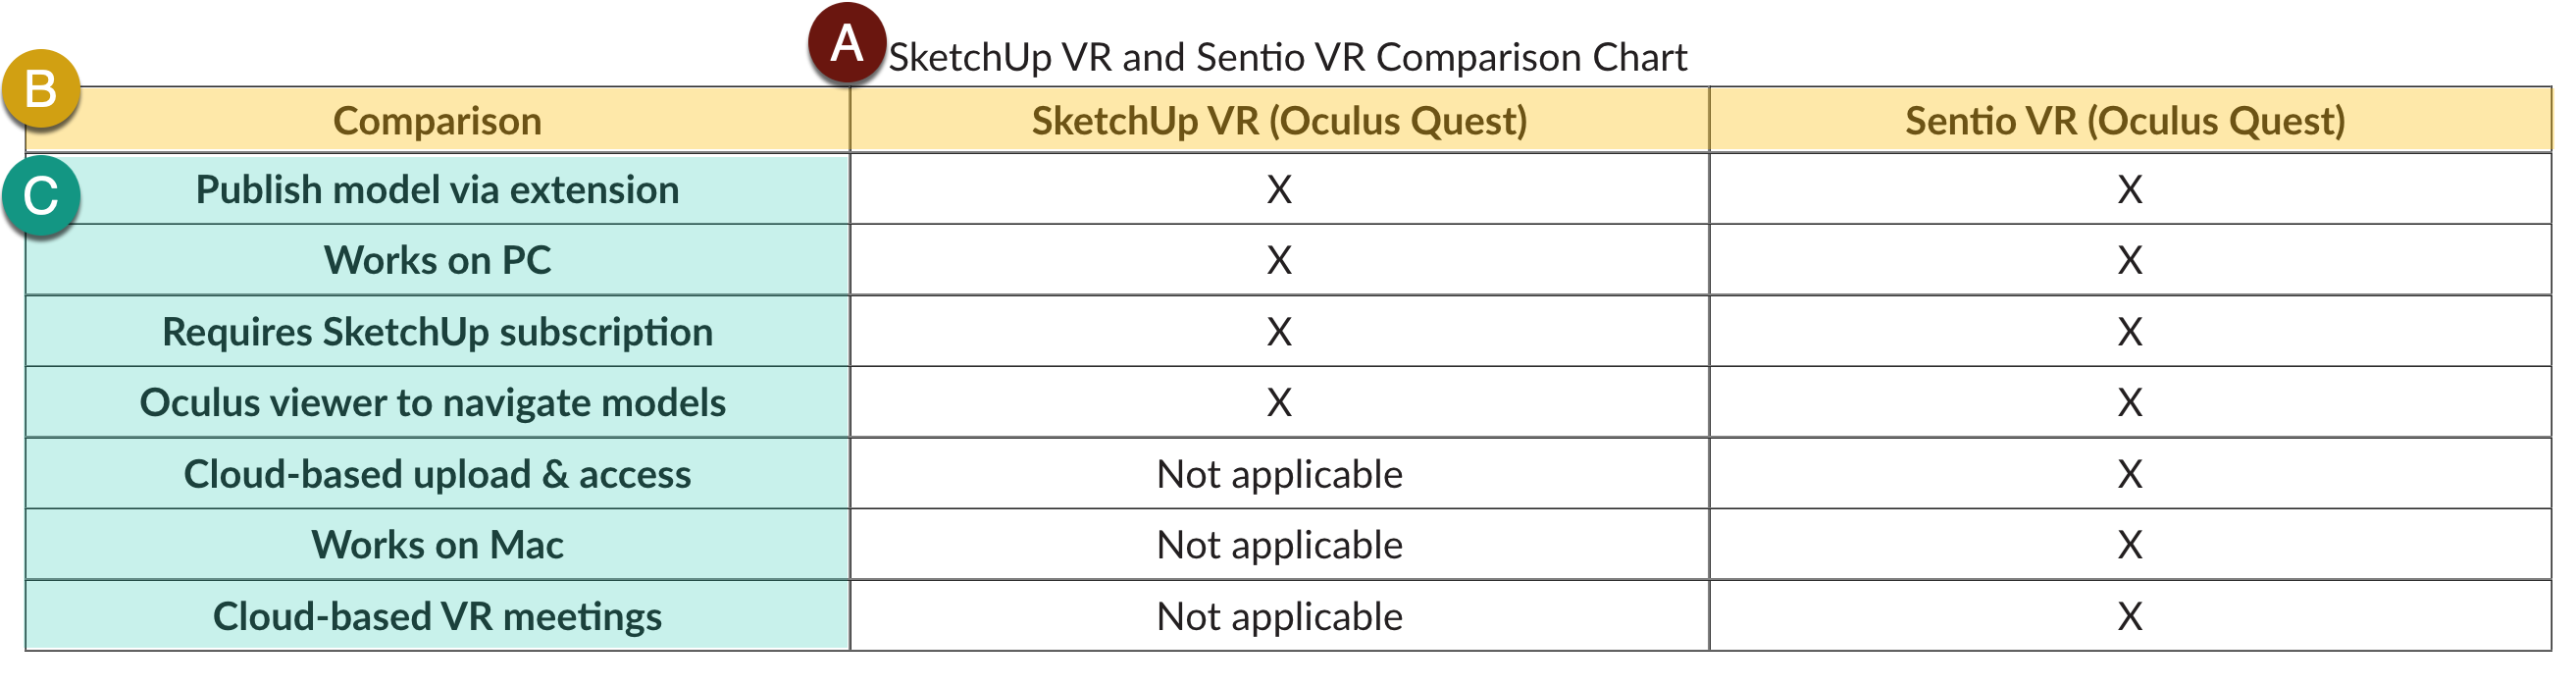
Elements of an accessible table
- Table caption: Think of this as the concise table.
- Example of row header in table.
- Example of column header in table.
Color
Color can be an effective method to communicate ideas and draw attention to information. Ensuring there is sufficient contrast as well as using color in combination with text formatting can support a diverse campus community, including individuals with visual disabilities.
Contrast
When choosing colors to present text information in documents, avoid pastel colors or the “light” version of a particular color. Such color options do not provide sufficient contrast against a white background. Contrast ratios should be the following:
- 4.5:1 for regular text
- 3:1 for 18 point font and larger, or 14 point font and bold
Contrast ratios may be evaluated using tools such as:
Color and formatting
When using color to indicate a specific condition or state, include text formatting to provide a distinguishing characteristic. For example, if a list of vocabulary words were identified only in red text, this could present difficulties for an individual who has a type of color-blindness.
Use color and formatting to support accessibility, such as:
- Red text with Bold formatting.
- Using an asterisk, brackets, or other annotation symbols in addition to color.
Video
Captions provide a text equivalent of the audio information of a video and are synchronized with the video presentation. Captions are an accessible alternative for individuals who cannot hear the content and includes the dialogue, speaker information, and any sound effects present in the video.
While the terms "captions" and "subtitles" are often used interchangeably, subtitles do not provide the same information. "Captions" and "subtitles" serve different purposes. Subtitles only provide the text version of the dialogue and often in different languages. Basically, subtitles assume an audience can hear the non-verbal audio. Captions provide the text version for both spoken and non-verbal audio.
Tips for captions
- Include all spoken information as well as relevant parts of the soundtrack like background noises, sound effects, speaker identification, and any audio cues that help the viewer understand the video.
- Captions should be in the same language as the primary audio content.
- Use proper punctuation and grammar.
What videos need captions?
Essentially, any videos that are available to the students or the public.
- Videos showcasing curriculum, research, exhibitions, or collections
- Videos profiling students, faculty, or researchers
- Videos providing instructions for how to apply or register for programs
- Videos listing news stories about your department or program
- Videos promoting your program or attracting students, participants, and alumni
Creating accessible documents
When creating content, there are a few basic steps that should be followed in order to assure your content is accessible. The core steps needed for accessibility are the same regardless of whether your document is in HTML, Microsoft Word, Adobe PDF, or another document format:
- Use headings
- Use lists
- Use meaningful hyperlinks
- Add alternate text to images
- Identify document language
- Use tables wisely
- Select the correct format based on the document intention (for example, if students need to complete a survey, consider creating a Canvas quiz in lieu of creating a Google Doc or Microsoft Word Doc
- Understand how to export from one format to another
Documents need additional formatting in order to be student-friendly. Please feel free to review the following support material for:
For additional guidance for document accessibility including Microsoft Word, PowerPoint, and PDF support please enroll in this free professional development:
CSU Accessible Document Training
Format: Independent-study, video-based online course
This training course is available to all CSU employees, and it provides the core fundamentals for creating accessible Word and PowerPoint documents as well as some high-level best practices in regards to PDF documents. An optional Excel module has been added to the course.
Read more about the WebAIM Accessible Document Training (*).
* CSYou login required